Month: October 2015

Halloween & Fall Ideas 2015

halloween2015
Halloween is in just a few days! Do you need to make a treat for work or for your kid’s school party? Here are almost all of the Halloween/fall treats that have been featured on my blog throughout the years. Enjoy & have a safe holiday!

1. Sugar Pumpkin Cupcakes
2. Halloween Oreo Stuffed Chocolate Chip Cookies
3. Pumpkin Mini Muffins
4. Sugar Skull Cupcakes
5. Cake Batter Halloween Cookies
6. Candy Corn Cookies
7. Sugar Mummy Cupcakes
8. Indian Corn Cake
9. Pumpkin Cupcakes
10. Pumpkin Raisin Bread
11. Mummy Cupcakes
12. Halloween Brownies
13. Hoot Owl Cupcakes
14. Pumpkin Sandwich Cookies
15. Trick-or-Treat Rice Krispie Treats
16. Ghost Cake
17. Spider Cupcakes
18. Pumpkin Cupcakes II
19. Frankenstein Cupcakes
20. Candy Corn Cupcakes
21. Halloween Oreo Stuffed Chocolate Cookies
22. Chocolate & Vanilla Halloween Cupcakes
23. Pumpkin Spiderweb Cookies
24. Halloween Puppy Chow
25. Candy Corn Surprise Cupcakes
26. Pumpkin M&M Cookies
27. Pumpkin Chocolate Chip Bread
28. Pumpkin Pi Cookies
29. Caramel Apple Cupcakes
30. Candy Corn Cupcakes
31. Skeleton Cookies
32. Frankencake
33. Day of the Dead Cookies
34. Ghost Cookies
35. Monster Cupcakes
36. Candy Corn Mummy Cookies
37. Apple Cookies
38. Halloween Confetti Cookies
39. Franken Candy-Corns
40. Blood Spatter Cookies

Blood Spatter Cookies

DSC_5961x900
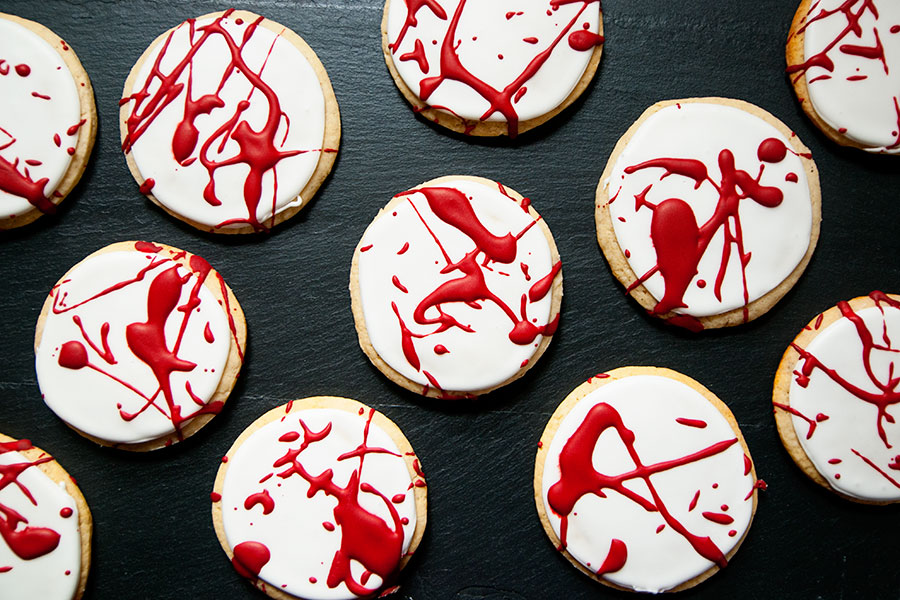
These cookies remind you of Dexter, don’t they? Dexter was one of the best shows of all time, but also one of the absolute worst (THAT ENDING. AMIRIGHT?! I AM STILL ALL-CAPS ANGRY ABOUT IT.) Dexter, for those of you who don’t know, was a blood spatter expert who worked for the Miami police department. His hobbies included cooking breakfast foods, sulking around like a moody teenager, and oh yeah, rockin’ it as a serial killer. No biggie. You’re intrigued, aren’t you? Netflix the show. The first four seasons are amazing. But it goes quickly downhill from there. Don’t say I didn’t warn you.

Anyway, what better way to celebrate Halloween than with some ooey, gooey blood spatter cookies?! These were so easy to make and really fun — cause you get to be suuuuuper messy!

If you are a new to decorating with royal icing, here are some helpful tips and links:

  • I used my grandma’s sugar cookie recipe, which is listed below.  Another good cut-out cookie recipe can be found at Bridget’s wonderful Bake at 350.
  • I used a royal icing recipe from Annie’s Eats, which is listed below.
  • If you are new to decorating with royal icing, please visit this post by Annie’s Eats, which will teach you about outlining and flooding.  Bake at 350 is also a great resource for cookie decorating and ideas (I love Bridget’s book, too!).

Here are the specifics on how I made these cookies:

  • I used a round cookie cutter — any size larger than 2″ will work.
  • I outlined and flooded with white icing and allowed the cookies to dry for at least a couple hours.
  • Now comes the fun part. Dye a bowl of royal icing red. Use AmeriColor’s Super Red — because nothing else will even come close to blood red. If you can’t quite get your red to be dark enough, add a little black food coloring; but do this very carefully and conservatively because you don’t want to add too much… and have your batch of icing ruined because it’s too dark.
  • Spread a generous layer of paper towels or newspapers all over your kitchen floor. I cannot stress this enough: cover as much of your floor as you can. Set your cookies on the floor. Using a fork, fling the red icing onto the cookies. There’s no great way to explain this. I just scooped up some red icing with a fork and flung it onto the cookies. You’ll make a mess and it won’t be perfect — embrace this!
  • Side note: if you want to take photos of your cookies, don’t wait until the next day. The red icing will bleed (no pun intended) into the white as time goes on.

Omi’s Sugar Cookies
Print Recipe
1 cup butter
1 cup sugar
1 large egg
1/2 teaspoon salt
3 cups flour
1 teaspoon baking soda
1/2 cup sour cream
1 teaspoon nutmeg

Beat butter and sugar. Add eggs, sour cream, and nutmeg. Add dry ingredients gradually. Chill the batter overnight or for at least 4 hours. Roll out dough and cut with cookie cutters. Bake at 350F until golden (in true fashion, my grandma didn’t give a specific baking time. I baked the cookies for about 8 minutes).


White Royal Icing
4 cups powdered sugar, sifted
2 Tablespoons meringue powder
5 Tablespoons water

Directions:
Combine all ingredients in the bowl of a stand mixer fitted with the paddle attachment. Mix on low speed until the sheen has disappeared and the icing has a matte appearance (about 7-10 minutes).  Transfer the contents of the mixing bowl to an air-tight container. This will be the stiffest consistency of the icing, and at this point it is still too stiff to use for decorating. Add water a very small amount at a time and stir by hand until fully incorporated. Continue until the icing has reached a consistency appropriate for piping. Depending on how large your cookies are, you may need to make more than one batch of this icing.

Franken-Candy Corns

DSC_5987x900

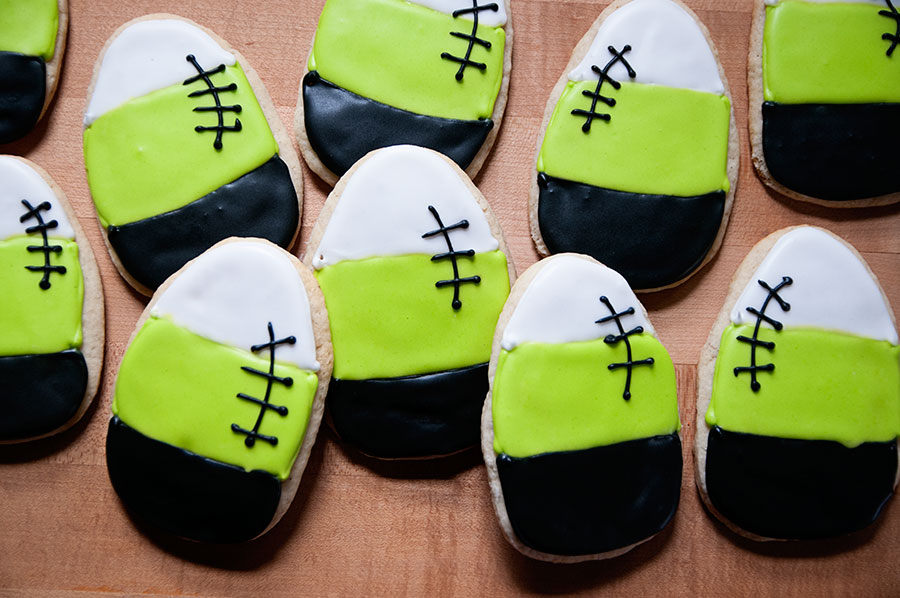
Here’s the problem with having a 7-year old baking blog: you run out of ideas for certain holidays. Halloween is my favorite baking holiday and I have done it all — candy corn everything, pumpkin everything, ghost cupcakes, skull cookies, you name it, I’ve probably made it. So I really had to think about what else I could do — franken-candy corns! These were simple and I think they’re pretty cute!

If you are a new to decorating with royal icing, here are some helpful tips and links:

  • I used my grandma’s sugar cookie recipe, which is listed below.  Another good cut-out cookie recipe can be found at Bridget’s wonderful Bake at 350.
  • I used a royal icing recipe from Annie’s Eats, which is listed below.
  • If you are new to decorating with royal icing, please visit this post by Annie’s Eats, which will teach you about outlining and flooding.  Bake at 350 is also a great resource for cookie decorating and ideas (I love Bridget’s book, too!).

Here are the specifics on how I made these cookies:

  • You will need a candy corn cookie cutter. Or, in a pinch, you can use an easter egg cutter. The shapes are similar and who is really going to care? Remember, they’re just cookies. :)
  • I used AmeriColor super black gel coloring and AmeriColor’s electric green gel coloring.
  • Divide the royal icing (see recipe below) into three bowls. Dye the icing in one bowl black, one bowl green, and leave the other white.
  • I outlined the cookies with the corresponding colors — black at the base, then green, then white at the tip. Wait a few hours and then flood your cookies.
  • Allow the cookies to dry completely, then pipe black stitching onto each cookie.
  • Easy, right?! Again, if you are unfamiliar with the concepts of outlining and flooding, please check out the links I posted above to Annie’s Eats or Bake at 350. Those cookie goddesses will teach you all you need to know.

Omi’s Sugar Cookies
Print Recipe
1 cup butter
1 cup sugar
1 large egg
1/2 teaspoon salt
3 cups flour
1 teaspoon baking soda
1/2 cup sour cream
1 teaspoon nutmeg

Beat butter and sugar. Add eggs, sour cream, and nutmeg. Add dry ingredients gradually. Chill the batter overnight or for at least 4 hours. Roll out dough and cut with cookie cutters. Bake at 350F until golden (in true fashion, my grandma didn’t give a specific baking time. I baked the cookies for about 8 minutes). Since these cookies were a bit larger, I would bake them for about 10 minutes. But watch them, as oven temps can vary!


White Royal Icing
4 cups powdered sugar, sifted
2 Tablespoons meringue powder
5 Tablespoons water

Directions:
Combine all ingredients in the bowl of a stand mixer fitted with the paddle attachment. Mix on low speed until the sheen has disappeared and the icing has a matte appearance (about 7-10 minutes).  Transfer the contents of the mixing bowl to an air-tight container. This will be the stiffest consistency of the icing, and at this point it is still too stiff to use for decorating. Add water a very small amount at a time and stir by hand until fully incorporated. Continue until the icing has reached a consistency appropriate for piping.

Note: you will likely need more than one batch of this icing, especially if the cookies you are making are large.

Halloween Confetti Cookies

DSC_5982x900
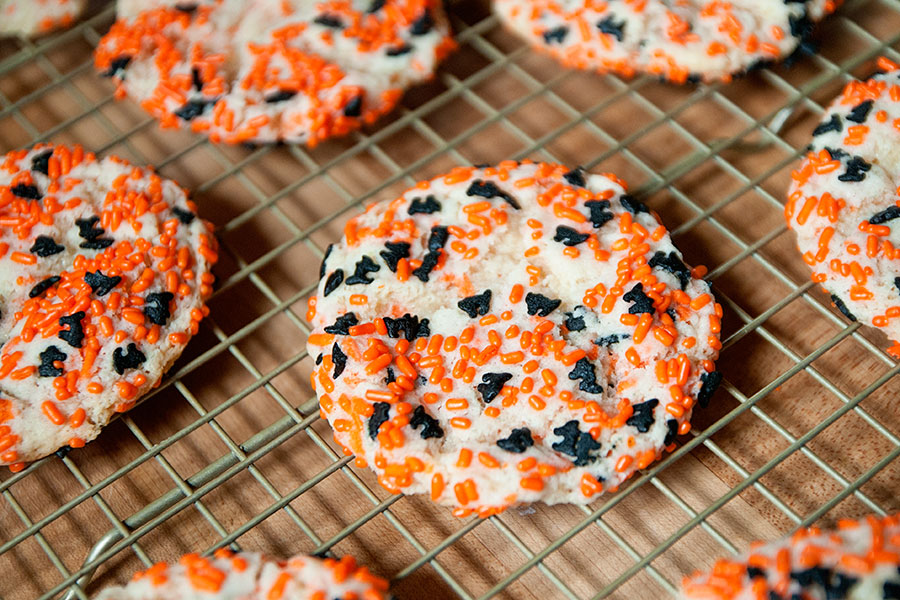
This is one of my favorite recipes — these cookies are so good and so damn simple! So much so that I’ve made them before — rainbow and Christmas! Now they’ve been Halloween-ized.

Halloween Confetti Cookies
Recipe source: Joy the Baker
Print Recipe

1-1/2 cups all-purpose flour
1 teaspoon baking power
1 teaspoon cream of tartar
1/2 teaspoon baking soda
1/2 teaspoon salt
1/2 cup (1 stick) unsalted butter, at room temperature
3/4 cup sugar
1 vanilla bean (I didn’t have one, so I left it out; the cookies turned out fine!)
1 large egg
1 teaspoon pure vanilla extract
About 1 cup of seasonal sprinkles (use jimmies, not nonpareils)

1. In a medium bowl, whisk together the flour, baking power, cream of tartar, baking soda, and salt.
2. In the bowl of an electric mixer fitted with the paddle attachment, beat the butter and sugar at medium speed until light and fluffy. Split the vanilla bean and scrape the seeds into the bowl (I skipped this step). Add the egg and vanilla extract, and beat until thoroughly combined.
3. Reduce the mixer speed to low and slowly add the dry ingredients to the wet ingredients. The dough will be thick. Fold in 1/4 cup of the sprinkles.
4. Put the remaining 3/4 cup of sprinkles in a small bowl. Scoop up 2 Tablespoons of dough and roll it into a ball (I used a cookie scoop and it worked well!). Dip the ball into the bowl of sprinkles to cover lightly. Put the ball on a plate. Repeat with the remaining sprinkles and dough, and chill the balls of dough for at least 2 hours.
5. Preheat oven to 350F. Line two baking sheets with parchment paper.
6. Transfer the chilled balls of dough onto the baking sheets, leaving about two inches between each ball.
7. Bake until the cookies have spread and are just beginning to brown around the edges, but are mostly pale and soft — about 10 minutes. Let cool on the cookie sheets for 5 minutes before transferring to wire racks to cool completely.

Makes about 18 cookies.

Apple Cookies

DSC_5928x900

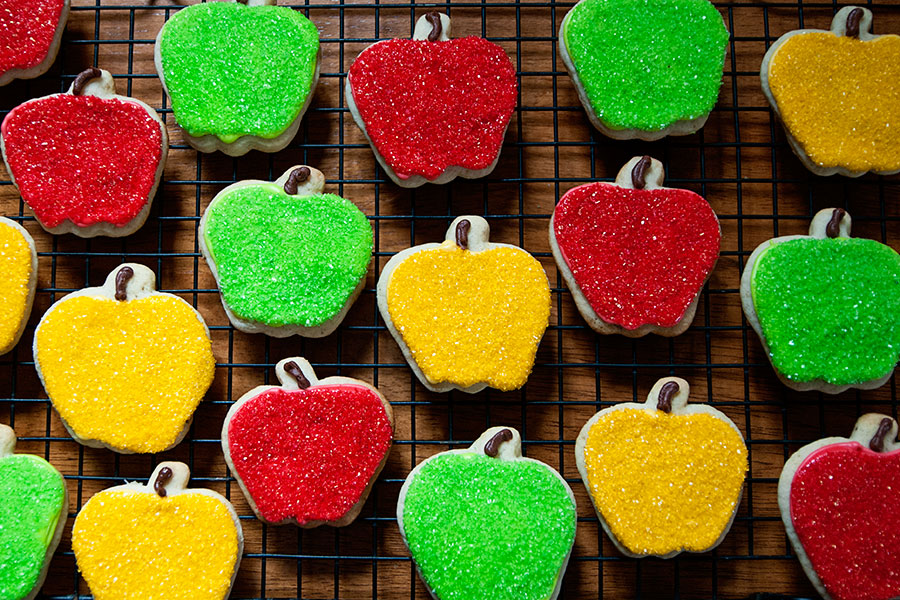
Little apple cookies! Aren’t they cute? I am in the camp that hates (hates) pumpkin spice anything, so I choose to make fall all about apples instead. Apple pie. Apple cider. Hard apple ale. It’s all good. What’s your favorite type of apple? It’s a tie between honeycrisp and granny smith for me. Here’s the scoop on how I made these cookies!

If you are a new to decorating with royal icing, here are some helpful tips and links:

  • I used my grandma’s sugar cookie recipe, which is listed below.  Another good cut-out cookie recipe can be found at Bridget’s wonderful Bake at 350.
  • I used a royal icing recipe from Annie’s Eats, which is listed below.
  • If you are new to decorating with royal icing, please visit this post by Annie’s Eats, which will teach you about outlining and flooding.  Bake at 350 is also a great resource for cookie decorating and ideas (I love Bridget’s book, too!).

Here are the specifics on how I made these cookies:

  • I used a small apple cookie cutter — mine was only about 2″. I wish more cutters would come in this size!
  • You will need red, yellow, and green sanding sugar; as well as red, yellow, and green food coloring. I used AmeriColor gel colorings. I chose more of a lime green so that my  green apples would look like granny smiths.
  • I bought a tub of chocolate frosting for the stems. I wasn’t about to waste the time making a whole batch of homemade chocolate buttercream just for those little stems!
  • I outlined the cookies with icing first using a small round tip (see below for the recipe I used); once the outlines set, I flooded each apple. Immediately after flooding, I dipped each apple into sanding sugar.
  • The last step is to pipe a little chocolate stem onto each apple.

Omi’s Sugar Cookies
Print Recipe
1 cup butter
1 cup sugar
1 large egg
1/2 teaspoon salt
3 cups flour
1 teaspoon baking soda
1/2 cup sour cream
1 teaspoon nutmeg

Beat butter and sugar. Add eggs, sour cream, and nutmeg. Add dry ingredients gradually. Chill the batter overnight or for at least 4 hours. Roll out dough and cut with cookie cutters. Bake at 350F until golden (in true fashion, my grandma didn’t give a specific baking time. I baked the cookies for about 8 minutes).


White Royal Icing
4 cups powdered sugar, sifted
2 Tablespoons meringue powder
5 Tablespoons water

Directions:
Combine all ingredients in the bowl of a stand mixer fitted with the paddle attachment. Mix on low speed until the sheen has disappeared and the icing has a matte appearance (about 7-10 minutes).  Transfer the contents of the mixing bowl to an air-tight container. This will be the stiffest consistency of the icing, and at this point it is still too stiff to use for decorating. Add water a very small amount at a time and stir by hand until fully incorporated. Continue until the icing has reached a consistency appropriate for piping.

Divide the icing into three bowls; dye one red, one yellow, one green. Outline the apples with the icing; wait a few hours then flood — and dip into the sanding sugar. Pipe a little chocolate stem onto each apple.

Note: depending on how big your apples are or how many you are making, you may need to make a few batches of this icing.