Month: January 2010

Pear-Raspberry Heart Pies

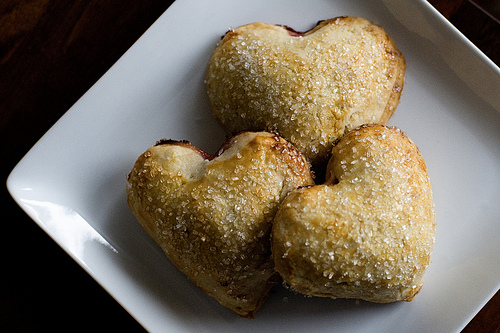
Holy cute! Need a special dessert for your Valentine’s Day dinner? I’d highly recommend these. The flavor combination of the pears and raspberries is delicious – and who doesn’t like pie?

Yield: About 10 mini pies

Pear Raspberry Heart Mini Pies

Pear Raspberry Heart Mini Pies

These mini pies are perfect for Valentine's Day and will be sure to impress!

Prep Time 30 minutes
Cook Time 40 minutes
Additional Time 1 hour 15 minutes
Total Time 2 hours 25 minutes

Ingredients

For the pastry:

  • 2-1/2 cups all-purpose flour, plus more for surface
  • 1 teaspoon salt
  • 1 teaspoon granulated sugar
  • 2 sticks cold unsalted butter, cut into small pieces
  • 1/3 cup plus 2 Tbsp ice water

For the filling:

  • 2 firm, ripe pears (1 pound) such as Anjou or Bartlett, peeled, cored, and cut into 1/4-inch cubes
  • 2 teaspoons fresh lemon juice
  • 1-1/2 Tablespoons unsalted butter
  • 3 Tablespoons granulated sugar
  • 1/4 teaspoon freshly grated nutmeg
  • 1/3 cup fresh raspberries, coarsely chopped
  • 1 large egg yolk, lightly beaten with 1 Tablespoon heavy cream, for egg wash
  • *sanding sugar for sprinkling

You will also need:

  • Heart-shaped cookie cutter (about 4-inches in diameter)

Instructions

    Make the pastry:

    1. Pulse flour, salt, and granulated sugar in a food processor until combined.

    2. Add butter and pulse until mixture resembles coarse crumbs with some larger pieces remaining (about 5 seconds).

    3. Evenly drizzle ice water over mixture. Pulse until mixture just begins to hold together (about 10 seconds).

    4. Turn out dough onto plastic wrap and wrap tightly. Shape into a disk. Refrigerate until firm, about 1 hour or overnight.

    Make the filling:

    1. Toss pears with lemon juice. Melt butter in a medium skillet over medium-high heat. Add pears, and toss to coat. Cook, adding granulated sugar a little at a time, until pears begin to soften (about 5 minutes). Stir in nutmeg.

    2. Transfer to a bowl and mix in raspberries.

    3. Divide dough in half and roll out each piece to 1/8-inch thickness on a lightly floured surface.

    4. Refrigerate until firm, about 15 minutes.

    5. Preheat oven to 350F.

    6. Drain pear-raspberry filling in a sieve.

    7. Cut out 20 hearts from dough using a 4-inch cutter, transferring them to a parchment-lined baking sheet.

    8. Lightly brush rims of half the hearts with egg wash, and top each with about 4 teaspoons filling. Top with remaining hearts and gently press around sides to seal.

    9. Brush pie tops with egg wash and sprinkle with sanding sugar. Bake until golden brown, about 40 minutes.

Notes

The dough can be frozen for up to 1 month; thaw before using. Pies can be stored at room temperature overnight.

Recipe credit: Martha Stewart Living

Homemade Shortbread Cookies

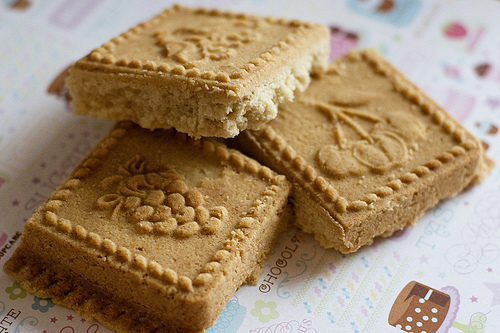
How many of you out in Internet-land like Walkers shortbread? Raise your hands. Oh, a lot of you. It’s no wonder, cause Walkers is THE BEST. This recipe, I kid you not, is *the* Walkers recipe! It tastes just like those oh-so delicious cookies wrapped in the cute red plaid packaging.

Now, just a bit of warning. If you’ve never made shortbread before, it can be tricky. There are only four ingredients, but it’s a finicky process to make it. So if your first or second batch don’t turn out, don’t get discouraged! It took me about 4 tries to get this recipe RIGHT. I don’t say this to scare anyone away from trying this, but I’m being honest. Baking should always be about learning and making mistakes every now and then, so don’t give up if your first foray into shortbread-making isn’t a raving success. :)

OK, on with the recipe!!

“Walkers” Shortbread
Recipe credit: Amber Bracegirdle from Bluebonnets & Brownies
Print Recipe

3 c flour
1/2 c + 2 tbsp sugar
1/2 tsp salt
2 sticks butter (at room temperature) — I used salted.

1. Preheat oven to 350F.
2. Thoroughly mix dry ingredients. (I used a whisk to ensure good mixing)
3. Using a food processor, mix the dry ingredients with the butter – pulsing until the mixture resembles coarse meal.

4. Gently, and with as little handling as possible, transfer the dough into a bowl and refrigerate this for about 30 minutes to re-chill the butter. The “dough” will look more like crumbs than a unified mixture. This is okay.
5. Remove the dough from the refrigerator. Pat or roll gently onto a baking sheet until you have a flat round or rectangular “cookie,” about 1/4 inch thick. Score this into pieces about 1×2 inches.
6. Bake at 350 degrees for 20-25 minutes, until edges of shortbread are browning, but not too dark. Remove from oven and allow to cool completely on baking sheet. Cut along scored lines into individual cookies.

*Note: A shortbread mold is INCREDIBLY helpful for this. Molds can be found on Amazon.com. I like to use a mold because I think it helps the shortbread to bake more evenly. This is the one that I currently use: Nordic Ware Cast-Iron Aluminum 9×9 English Shortbread Pan.

**Regardless of what method you use to bake the shortbread, make sure to poke the dough with a fork before you bake to allow ventilation.

I'm a bad blogger. I know.

I was talking to my dad on the phone this morning and he said to me, with great gusto, “you need to update Sprinkles! I go on there every day and there is never anything new!”

I know, I know. I hang my head in shame – and if I had a tail, it would be between my legs. I haven’t baked in a long time. This is not for lack of desire or inspiration to do so, but I currently have two major road blocks:
1. School (believe me, I’d rather be baking than doing work on environmental public health!)
2. I have no one to bake for. I don’t like wasting food, so currently I only bake when I have an outlet for the end result.

I hope you’ll all bear with me and keep this blog in your bookmarks or RSS readers. There are ebbs and flows to everything in life and I’m stuck in a little baking ebb at the moment. I am working on perfecting an oh-so-divine shortbread recipe, so hopefully that will pop up on the blog in the coming weeks.

Much love, sugar, and sprinkles to you all. :)

Cerella’s Puffs

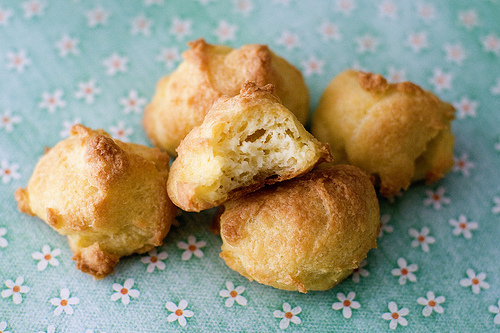
Happy New Year!
I hope everyone had a lovely New Year’s Eve and I hope 2010 is happy, safe, and healthy for all of you! Now, onto something a little unhealthy: puff pastries!

My grandmother used to make these delicious little puff pastries all the time. There are two ways you can make them: with vanilla extract (if you will be stuffing the pastries with something sweet, like cream) or without vanilla extract (if you will be stuffing them with something savory, like chicken salad). They are light, fluffy, and oh-so-tasty.

Cerella’s Puff Pastries
Print Recipe

1/2 cup butter
1 cup water
1 cup flour
1/2 teaspoon salt
3 eggs
optional: 1 teaspoon vanilla

1. Preheat oven to 400F and line a cookie sheet with parchment paper. Beat the three eggs slightly and set aside.
2. Put water and butter in a saucepan and heat to a boil. Add flour and salt, stirring constantly for 1 minute.
3. Remove from heat and add slightly beaten eggs, then vanilla (if you choose to do so). Stir thoroughly. The mixture should blend together nicely and be pale yellow in color.
4. Drop by tablespoons on the lined cookie sheet. Bake for 30 minutes — or until edges start to brown.
5. When cooled, split and fill with chicken salad, tuna salad, or whatever else you’d like!