Month: December 2015

Malted Milk Cupcakes

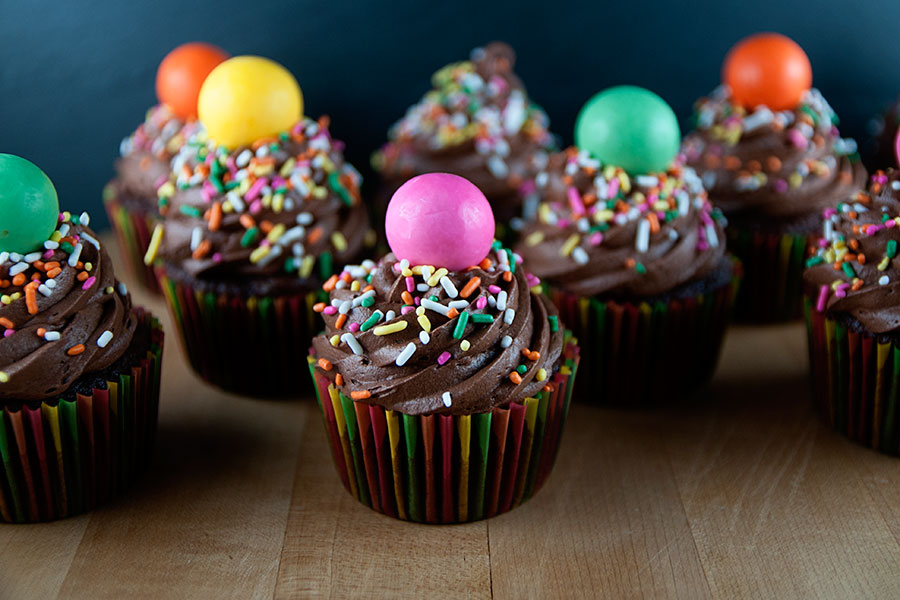
DSC_2826x900I’ve had these gigantic malted milk balls in my cupboard for months and never knew what to do with them. I mean, yeah, eating them was an option. But look how pretty they are! Too pretty not to use in some baking project! So, Google to the rescue! Of course malted milk cupcakes exist. Because why not?

Malted Milk Cupcakes
Recipe source: Tracy’s Culinary Adventures
Print Recipe

2 cups all-purpose flour
2 cups sugar
2 teaspoons baking powder
1 teaspoon salt
1 cup malted milk powder
6 oz unsweetened chocolate, finely chopped
1/2 cup unsalted butter
1/4 cup canola oil
1 3/4 cups whole milk, at room temperature
3 large eggs, at room temperature
2 teaspoons vanilla extract

For the frosting:
12 oz milk chocolate, finely chopped
1 cup malted milk powder
1 cup heavy cream
1/2 cup (1 stick) unsalted butter, at room temperature

Plus malted milk balls to garnish.

1. Preheat oven to 350 F. Line muffin pans with paper liners.
2. In the bowl of a stand mixer fitted with the paddle attachment, combine the flour, sugar, baking powder, salt, and malted milk powder. Whisk until well combined.
3. Add the chocolate and butter to a microwave-safe bowl and microwave in 30-second bursts on 50% power, stirring in between each, until the mixture is melted and smooth. Stir in the oil until combined.
4. Add the chocolate mixture to the bowl with the dry ingredients, along with 1 cup of the milk and beat on low speed until combined, stopping to scrape the sides and bottom of the bowl once or twice.
5. In a measuring cup, whisk together the remaining 3/4 cup milk, eggs, and vanilla. Pour half of this mixture to the mixer bowl and beat on low speed until incorporated then add the second half and beat again on low speed until everything is combined (scraping the bottom and sides of the bowl as necessary).
6. Divide the batter evenly among the liners, filling each about 3/4-full. Bake for about 20-24 minutes, or until the cupcakes spring back when lightly pressed and a toothpick inserted in the center comes out clean. Remove the pan to a wire rack and let the cupcakes cool for a few minutes, then remove them to the rack to cool completely.

To make the frosting:
1. Add the chocolate to the bowl of your stand mixer. In a small saucepan whisk together the malted milk powder and heavy cream. Set the pan over medium heat, and stirring almost constantly, bring the mixture to a simmer. Pour the cream mixture over the chocolate (do not stir yet) and then cover the mixer bowl with plastic wrap. Set aside for 5 minutes.
2. Remove the plastic wrap and gently whisk the mixture until the chocolate is melted and smooth. Cover the bowl with plastic wrap and refrigerate for about 2 hours, or until well chilled.
3. Place the bowl on your stand mixer fitted with the whisk attachment. Cut the butter into 1/4-inch cubes. Start mixing on low, and gradually add the pieces of butter to the chocolate mixture in the bowl – let one incorporate before adding the next. After you’ve incorporated all the butter, increase the mixer to medium-high speed and beat until the frosting is smooth and thick.
4. Transfer the frosting to a large pastry bag fitted with a decorative tip. Pipe frosting into a swirl on each cupcake. Garnish each cupcake with a malted milk ball, if desired.

Makes 24 cupcakes.

Christmas Tree Cookies

DSC_3725x900
Holy shiz, it’s December 17th and I’m just now blogging for Christmas! Better late than never, right? *blinks* Right?

These cookies were pretty easy to make — no outlining, no flooding involved! If you are a new to decorating with royal icing, here are some helpful tips and links:

  • I used my grandma’s sugar cookie recipe, which is listed below.  Another good cut-out cookie recipe can be found at Bridget’s wonderful Bake at 350.
  • I used a royal icing recipe from Annie’s Eats, which is listed below

Here are the specifics on how I made these cookies:

  • I found this cookie cutter on sale at Williams-Sonoma a few years ago. I was pretty excited to find it because of its unique tree shape.
  • I dyed the majority of my royal icing green using Wilton’s Leaf green gel coloring. I reserved a small amount of icing for the stars and used Wilton’s Buttercup get coloring.
  • I piped the branches and stars using a small round tip. The small round sprinkles were found at Hobby Lobby — and I believe they were a Wilton product.
  • That’s it — easy, right?

Omi’s Sugar Cookies
Print Recipe
1 cup butter
1 cup sugar
1 large egg
1/2 teaspoon salt
3 cups flour
1 teaspoon baking soda
1/2 cup sour cream
1 teaspoon nutmeg

Beat butter and sugar. Add eggs, sour cream, and nutmeg. Add dry ingredients gradually. Chill the batter overnight or for at least 4 hours. Roll out dough and cut with cookie cutters. Bake at 350F until golden (in true fashion, my grandma didn’t give a specific baking time. I baked the cookies for about 8 minutes).


White Royal Icing
4 cups powdered sugar, sifted
2 Tablespoons meringue powder
5 Tablespoons water

Directions:
Combine all ingredients in the bowl of a stand mixer fitted with the paddle attachment. Mix on low speed until the sheen has disappeared and the icing has a matte appearance (about 7-10 minutes).  Transfer the contents of the mixing bowl to an air-tight container. This will be the stiffest consistency of the icing, and at this point it is still too stiff to use for decorating. Add water a very small amount at a time and stir by hand until fully incorporated. Continue until the icing has reached a consistency appropriate for piping.