Month: December 2009

Chocolate Covered Potato Chips

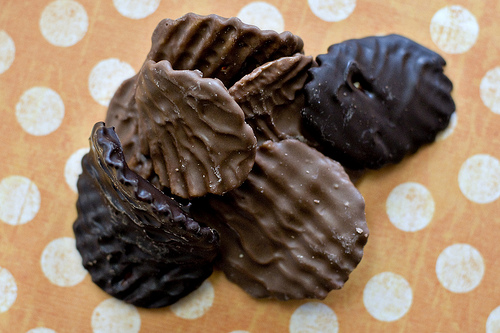
Chocolate covered potato chips have a lot of history in my family. My grandfather used to own a potato chip factory (which was then passed on to my dad) in my hometown of Oshkosh, WI – so potato chips have been a big part of my life from an early age! And what’s better than a potato chip? A potato chip covered in CHOCOLATE.  My grandfather used to sit in the basement of his house every December and make boxes and boxes of chocolate covered chips to give as gifts. It’s a somewhat tedious process, but the end result is SO worth it.

Here’s how my family makes them and what you will need!

Chocolate Covered Potato Chips

Chocolate Covered Potato Chips

These make the perfect gift at Christmastime!

Prep Time 15 minutes
Additional Time 1 hour
Total Time 1 hour 15 minutes

Ingredients

  • 8-10 cups ridged potato chips (Wavy Lays work well)
  • 1 pound of good quality chocolate (you can use milk or dark, doesn’t matter)

Instructions

    1. Chop the chocolate and melt in a double-boiler. Continually stir the chocolate until it has melted and reached a temperature of about 110 F.

    2. Once the chocolate has melted, remove from heat and let it cool to about 90F. You want it to cool a bit so you can work with it!

    3. Dip the potato chips into the chocolate and coat. Place on waxed paper to cool.

Notes

Your yield will depend on how many chips you dip into the chocolate.


Old-Fashioned Sugar Cookies

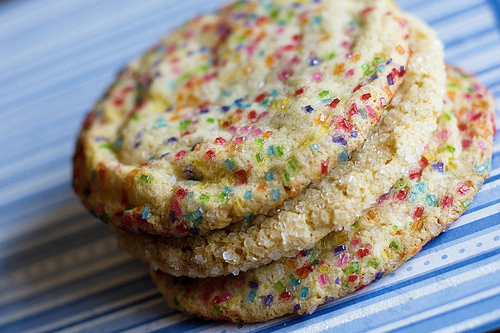
I’m currently in graduate school and I’m in the middle of finals week. Fun, right? ;) I wanted to bake something for my study group this week and couldn’t quite decide what to make. I wanted something simple – because I don’t have a whole lot of time to dedicate to my baking projects right now. I also wanted something that I knew everyone would enjoy. This delicious recipe for sugar cookies stood out immediately. Sugar cookies are definitely a favorite of mine. Sugar + butter. What could be better?

Old-Fashioned Sugar Cookies
Recipe Source: Martha Stewart Cookies
Print Recipe

3 cups all-purpose flour
1 teaspoon baking soda
1/4 teaspoon coarse salt
1-3/4 cups granulated sugar
1/4 cup packed light brown sugar
1 tablespoon finely grated lemon zest
1 cup (2 sticks) unsalted butter, at room temperature
2 large eggs
1 tablespoon fresh lemon juice
+ sanding sugar for sprinkling

1. Preheat oven to 350F. Sift together flour, baking soda, and salt.
2. Put sugars and zest in the bowl of an electric mixer fitted with the paddle attachment. Mix on medium speed for 30 seconds. Add butter; mix until pale and fluffy, about 1 minute. Mix in eggs one at a time, and then the lemon juice. Reduce speed to low; gradually mix in the flour mixture.
3. Using a 2-inch ice cream scoop, drop dough onto parchment paper-lined baking sheets, spacing 3 inches apart. Flatten cookies slightly; sprinkle with sanding sugar. Lightly brush with a wet pastry brush; sprinkle with more sanding sugar.
4. Bake cookies until golden, about 15 minutes, rotating sheets halfway through. Transfer cookies to wire racks using a spatula; let cool completely. Cookies can be stored in airtight containers at room temperature for up to three days.

Notes:
– I didn’t have a lemon, so I left out the lemon zest. I also used store-bought lemon juice, instead of fresh lemon juice. They are still delicious!
– These cookies will be HUGE.
– I rolled the dough in sugar, then placed it on the cookie sheet – instead of doing the brush-with-a-wet-pastry-brush thing. Also, feel free to use colored sanding sugars. I ran out of white, so I used a colored mixture and I think they are so pretty!

Peanut Butter Cookies

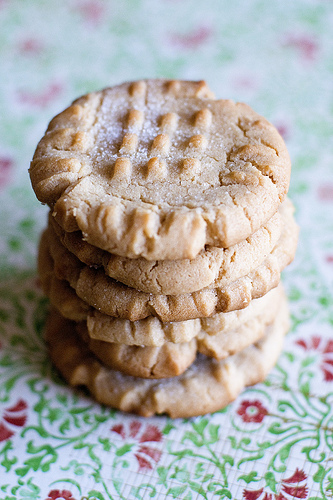
Mmmm peanut butter. Mmmm. I am a fan of all things having to do with peanut butter – PB&J, buckeyes, peanut butter cups, you name it. But sometimes a simple peanut butter cookie is all you need. Here’s a favorite recipe of mine.

Peanut Butter Cookies
Print Recipe

1/2 cup granulated sugar
1/2 cup packed brown sugar
1/2 cup peanut butter
1/4 cup shortening
1/4 cup butter, softened
1 large egg
1-1/4 cups all-purpose flour
3/4 teaspoon baking soda
1/2 teaspoon baking powder
1/4 teaspoon salt
+ extra granulated sugar

1. Preheat oven to 350F. In a large bowl, beat 1/2 cup granulated sugar, brown sugar, peanut butter, shortening, butter, and egg with an electric mixer on medium speed. Stir in flour, baking soda, baking powder, and salt.
2. Shape dough into 1-1/4 inch balls. On ungreased cookie sheet, place balls about 3 inches apart. Flatten in crisscross pattern with fork dipped in additional granulated sugar.
3. Bake 9-10 minutes or until light brown. Cook 5 minutes; remove from cookie sheet to cooling rack.

Back with a baking failure!

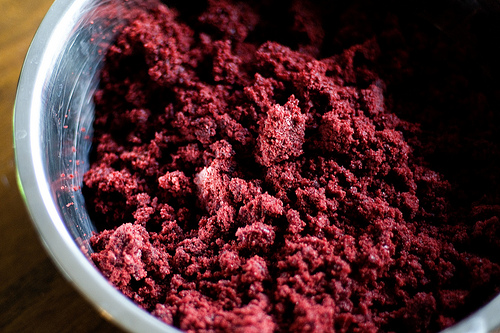
I’m back. Back to blogging, back to baking. Just in time for the fun holiday season! I was going to make cake pops (a la Bakerella.com) for my school Christmas party and frankly, they were a disaster. But since I’m a believer in showing the failures along with the successes, here we go.

You start by baking a 9×13 cake from a box mix. Can be any flavor, but I chose red velvet because it was the most festive. Once the cake has cooled completely, crumble it up in a big bowl.

Then add one tub of cream cheese frosting to the cake crumbles. Mix thoroughly – mix with your hands, it’s the easiest, despite how messy it will get!

Next step is to shape the cake + frosting mixture into balls. Line them up on wax paper and refrigerate them for a few hours.

And here’s where it all went wrong! The next steps involve melting chocolate and coating the cake balls with chocolate. Well, the chocolate wouldn’t stick to the cake balls. The lollipop sticks that I used kept falling out. The chocolate coating went on too heavily and just dripped off. It was a mess. And frankly, I didn’t think they tasted all that great. The combination of cake + frosting + chocolate + decorative sprinkles was just too much.

So lesson learned. I’ll leave this one alone and let Bakerella and all of the other chocolate/candy experts tackle it!