Author: Annie

Peanut Butter Pie

I currently follow about two hundred baking/food blogs on my Google Reader. One of those blogs belongs to Jennifer Perillo. Jennifer lost her husband Mike last week due to a massive and sudden heart attack. He left behind Jennifer and their two daughters. She posted a simple and heartwrenching message on Twitter: “He’s gone.” My heart is broken for her.

Twitter and Facebook immediately exploded with an outpouring of love and support. Jennifer asked that everyone make a peanut butter pie for someone they love — as it was something she was going to do for Mike, but life kept getting in the way and she never found the time. Hundreds, if not thousands, of people have made peanut butter pies this week — pies for the ones they love and for Mikey.

When people tease me about my love (and sometimes obsession) with social media, I love that I can point to instances like this to show the immense good that can come from it. So many people, many of which never knew or spoke to Jennifer, are helping her grieve.

If you are on Twitter, be sure to check the #apieformikey hashtag. You will be inspired by the outpouring of support. The food blogging community isn’t perfect and we don’t always get along flawlessly, but I am proud to be a part of a group that always joins together, without abandon, when someone needs help.

So hug the ones you love extra tight today & make a peanut butter pie.

Yield: About 8 slices of pie

Peanut Butter Pie

Peanut Butter Pie

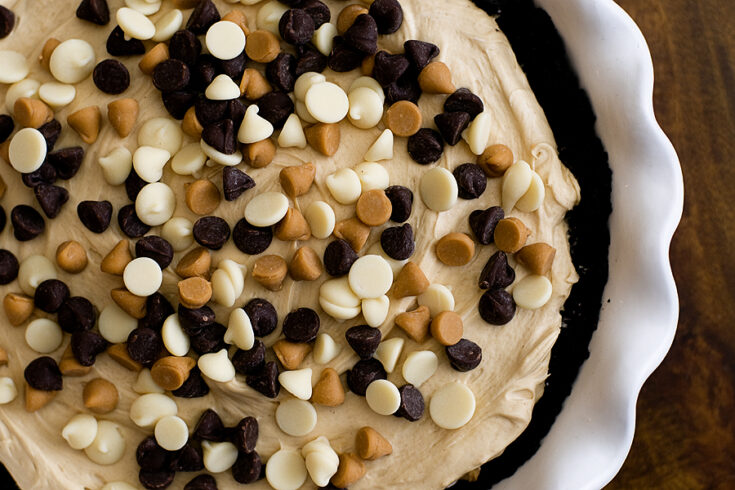
Rich, creamy, peanut butter-y perfection!

Prep Time 20 minutes
Cook Time 7 minutes
Total Time 27 minutes

Ingredients

For the crust:

  • 25 Oreo cookies
  • 4 Tablespoons butter, melted

For the filling:

  • 1 cup creamy peanut butter
  • 8 oz cream cheese, softened
  • 1-1/4 cups powdered sugar
  • 8 oz Cool Whip, thawed

Instructions

    1. Preheat oven to 350F.

    2. Crush the Oreos in a food processor until they are crumbs. Pour the melted butter over the Oreo crumbs and stir with a fork to combine. Press into a pie pan and bake for 5-7 minutes, or until set. Remove from oven and allow to cool completely.

    3. Beat the peanut butter with the cream cheese until smooth. Add the powdered sugar and beat until smooth. Add in the thawed Cool Whip and mix, scraping the sides as needed.

    4. Pour the filling into the crust, evening out the top with a spatula. Chill for at least 1 hour prior to serving. Top with chocolate chips or crushed Reese’s peanut butter cups.

Notes

Your yield will depend on how big or small you cut your pieces of pie.

Recipe credit: The Pioneer Woman

Candy Melt Pretzel Bites

I think this was the fastest recipe I’ve ever made. From start to finish, it took me about 10 minutes to make all of these. Super easy and quick treat — and kids will love them because of the colors! The only downfall was the huge amount of pretzels and M&Ms I ate while assembling them… yummy!

Yield: Makes MANY!

Candy Melt Pretzel Bites

Candy Melt Pretzel Bites

A FAST and EASY treat for your next get-together!

Prep Time 15 minutes
Cook Time 2 minutes
Total Time 2 minutes

Ingredients

  • 1 bag of pretzel squares
  • 1 bag of candy melts, Hershey Kisses, or Rolos (I used a variety pack of candy melts)
  • 1 bag of M&Ms (I used white M&Ms that I had leftover from Christmas!)

Instructions

    1. Preheat oven to 350F and line a cookie sheet with aluminum foil.

    2. Lay out as many pretzels as you’d like to make. I filled the entire cookie sheet.

    3. Place a candy melt (or Hershey Kiss, Rolo, etc) on top of each pretzel square.

    4. Put the entire cookie sheet into the oven. The baking time will vary depending on what type of candy you choose to use, but the baking time will be QUICK! It took about 1-1/2 minutes for the candy melts on these to soften. Watch them in the oven as they heat up to insure that they don’t melt entirely or burn.

    5. Remove from the oven and immediately place an M&M on top of each pretzel. Let all of the pretzel bites cool thoroughly before serving. Enjoy!

Notes

These are a fantastic treat that your kids or grandkids can help you make. You can change the ingredients and colors to make them seasonal. For example, use all orange and purple candy melts near Halloween.

Candy Land Cake

Candy Land has always been my favorite board game. Even as a twenty-something, I still ADORE it. It reminds me of being a kid and all of the memories of playing the game with my grandparents. It’s a classic game that I hope to someday play with my own kids. I made this cake for Teya, who turned 1 year old last week. Her mom let me pick the theme of her birthday cake — which was perfect, as I’ve been wanting to make a Candy Land cake for YEARS! Here’s how I did it…

  • First and foremost, I cheated. I had to make this cake on a Friday afternoon/evening and only had about 8 hours to work — and I was leaving early the next morning for an out-of-town wedding. I didn’t have the flexibility that I normally have when making birthday cakes. So I made my life easier and bought a pre-made cake from a local bakery. The cake is HUGE. It was about 18″x24″ — and you will need all of that space to fit in all of the elements of the game. The bakery also frosted the cake for me, another huge time-saver!
  • I used a small (about 1″x1″) square fondant cutter to make the board game squares. I rounded the corners a bit to make it look softer. You’ll also need to shape the pieces according to the curves in the path. Before I placed any of the fondant squares on the cake, I used a knife to “draw” the path into the cake so I had a template to go from.
  • You can use any Candy Land board you’d like for inspiration. I think the older boards are far more charming, so I drew more inspiration from the 1960s/1970s/1980s boards than I did from the current board. All you have to do is Google “Candy Land board” and you’ll be presented with a ton of images to get ideas from.
  • I mixed white and red fondant together, rolled it out, and used alphabet fondant cutters to make the “Happy Birthday Teya!” text. I wanted a look that was similar to the candy cane style of the “Candy Land” lettering.
  • Peanut Acres was made by piping green frosting onto the cake for “grass”, and then placing butterscotch chips and orange circus peanuts onto the cake.
  • I had to special-order the candy hearts from an online candy store — as we are definitely out-of-season for Valentine candy!
  • I also had to special-order the small candy canes for the Mint Forest. I found the red & white starlite mints at Walgreens.
  • Lord Licorice’s section of the board was made by cutting red and black licorice sticks in half and then pressing them into the cake.
  • The rainbow path was made using a sweet-and-sour candy that I found at Walgreens. I forgot the name of the candy — but it comes in a bright green package!
  • Lollipop Woods was made using Dum Dums.
  • Gumdrop Mountain was make using both large and small gumdrops, placed onto a bed of green frosting.
  • The ice cream floats are Neapolitan coconut candies — the smaller candies are made by Brach’s. I found them at a local grocery store, but you can also order them here.  The larger floats were cut from Neapolitan coconut candy bars made by Candy Farm. I found them at Hallmark of all places, but you can order them online here. I used blue food coloring spray (available at most grocery stores or bake shops) for the water.
  • The Chocolate Swamp was made from a variety of items: chocolate sprinkles, chocolate chips, large Reese’s peanut butter cups, and small peanut butter cups. I used a large round piping tip to pipe chocolate frosting onto the peanut butter cups. I added candy eyes to make the monster.
  • The candy castle was created using ice cream cones, plain buttercream frosting, sprinkles, and white rock candy. I cut each ice cream cone in half and piped a large amount of frosting onto each piece using an 1M tip. I placed the pieces of the “castle” onto the cake and covered in sprinkles. I surrounded everything with white rock candy. You can also add a pink or red M&M to the top of each.
  • I cut rectangles out of fondant and piped the name of each “land” using a very small round pastry tip.

I tried to include as much information as I could, but if you have any questions, feel free to contact me! Here are more photos:

Cookies Inspired by “Up”

Please visit my wonderful friend Amber’s blog, Bluebonnets & Brownies, as I am guest-posting for her today. xoxo

Baby Shower Cake

As you remember from Monday, I made Care Bear cupcakes for a baby shower. Well, this was the other cake I made for the same shower! Needed to balance the 80s cartoon fun with a little elegance. I don’t really have much to instruct or say about this cake. It’s a simple square tiered cake, frosted with buttercream, and decorated with sugared roses and flowers (purchased from Vanilla Bean).

A common question that I get about the cake that I make is whether or not I make them from scratch. I don’t. If I’m going to spend hours and hours decorating and making frosting, I need to save time (and a little sanity) with the cake. Cakes using a box mix as a base are consistent, reliable, and predictable. It’s one less thing to worry about! I do, however, enhance the box cake mix by adding pudding mix and sour cream. This results in a more dense and moist cake. Here’s my doctored cake mix recipe!

Box Mix Cakes… Enhanced!
Recipe source: My Baking Addiction
Print Recipe

1 box cake mix
1 box instant-pudding mix (4-serving size) — be sure that you MATCH your cake mix and pudding mix flavors!
3 eggs, lightly beaten
3/4 cup vegetable oil
1/2 cup water
3/4 cup sour cream
2 teaspoons vanilla extract

Preheat oven to 350. Mix all ingredients together using an electric mixer. Mix until smooth. Pour cake mix into a well-greased pan and bake according to box directions. Though I would recommend watching the cake because I’ve found that it usually takes less time to bake than the box directions require.