
With Sprinkles on Top turned SIX YEARS OLD yesterday! I can’t believe that I started the blog back in 2008. Doesn’t that seem like eons ago? Last year I made a polka-dotted cake to celebrate. This year I’m celebrating Dorothy, Rose, Blanche, and Sophia with a Golden Girls cake!
I love the Golden Girls. Aside from the fact that it’s just a damn funny sitcom, I also love it because my grandma and I used to watch it together. The show used to air on Saturday nights (weird, right?). My grandparents babysat me on Friday and Saturday nights…so my parents could, you know, drink up and have a social life. I can still remember seeing those four funny ladies on the television in my grandparents’ living room. I miss my Omi and Poppi (and their cozy house) more than words can say.
The Golden Girls theme song was titled “Thank You For Being a Friend” — and thank YOU, my dear blog readers, for being my friend throughout the years. I appreciate every single comment and suggestion you leave. Truly. Here’s to many more years of sugary treats!
Golden Girls Cake
Print Recipe
I don’t have a recipe for this cake — I had no idea if the technique would even work — so here are my bullet points in case you are interested in trying it!
- First and foremost, I must bow down and give thanks to the amazing Tiffany — whose blog and Golden Girls cake inspired me to try and make my own. Seriously, so cool!
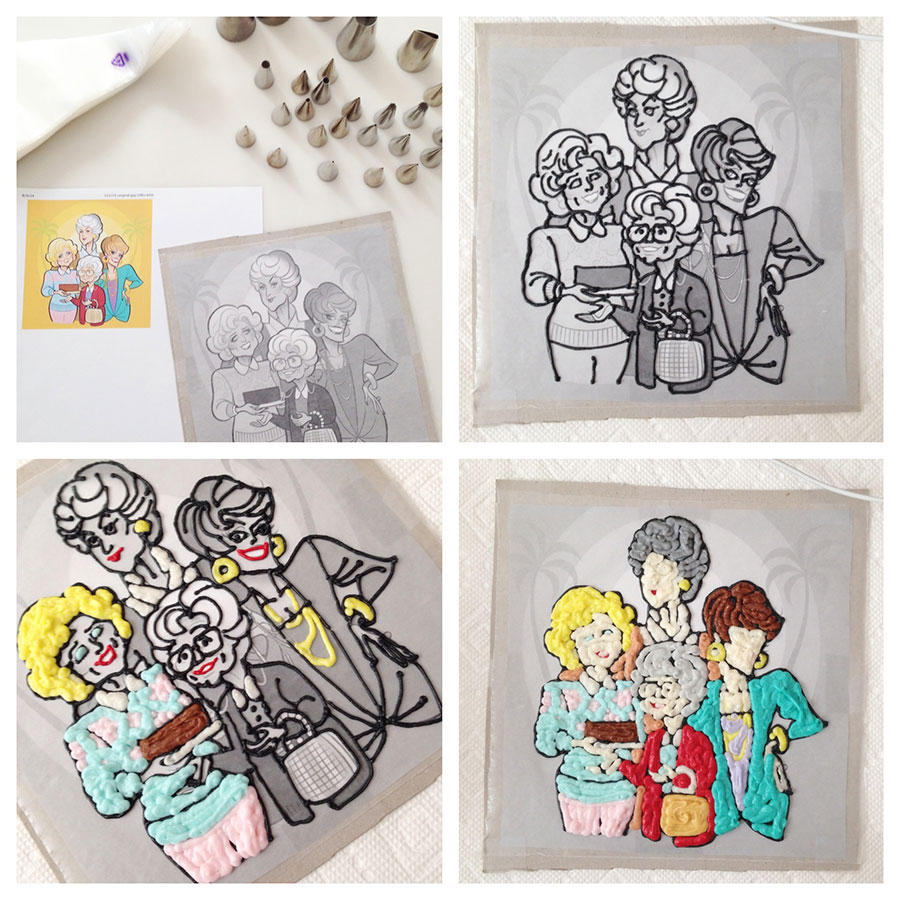
- The technique used to make the Golden Girls is a buttercream transfer. Tiffany has a buttercream transfer tutorial that I used to learn. Essentially, you trace your design onto wax paper and fill it in with icing. Kind of a color-by-numbers approach. When you are finished, the design must be frozen for AT LEAST 2 hours. The longer you freeze it the better though.
- When you remove the design from the freezer, you must work quickly because wow, that frosting comes back to room temperature quickly! While working as fast as possible, flip the design over and onto your cake — and peel off the wax paper. You’ll be left with a beautiful design that looks like you somehow hand-drew the whole thing.
- This is the Golden Girls cartoon drawing that I used for the cake. You’ll need to re-size the image to make it larger. Much larger. I re-sized it so that it would fit a 8×11 sheet of paper.
- Once you’ve got a re-sized version printed, tape a piece of wax paper on top of the cartoon. Then begin the buttercream tracing, etc. This design was tedious and took quite a while to do because of all the colors involved.
- I used the white buttercream icing recipe listed here for the entire design.
- Speaking of colors — I used all Wilton gel colorings. You’ll need just about every color for this! If you have any specific color-related questions, let me know. It would be too difficult to list every single color I made/used.
- I used small round pastry tips. The smaller the better for the black outlining. You can go a bit bigger when you start to fill the other colors in. I think I mainly used a #2 round tip.
- And a word about the cake. I had never done a buttercream transfer before and I had NO IDEA if it would be a success or a total disaster. Because of this uneasiness, I decided to buy a cake from the grocery store. I didn’t want to take the time and energy to make one from scratch — only to have the transfer not work! I bought the cake at Festival Foods and it only cost about $18. Of course, I picked the most ridiculous rainbow cake they had — because what are the Golden Girls if not flamboyant?!
- I hope these links and tips have helped you. If you want to try making a cake like this and have more questions, please contact me! I apologize for not having more instructions — but this was a last-minute, who-the-hell-knows-if-this-will-work kind of endeavor. :)


This is one of your “ideas” I WILL NOT EVEN TRY ………….. I could NEVER frost 4 girls……….you are way above me in that kind of talent.
Congrats on 6 years!!!!!!!!
Thanks, Carol! :)
I have always wanted to try a butter cream transfer! This looks wonderful. I think you have given me the courage to finally try one. I adore the Golden Girls, too!