Month: July 2013

Dreamsicle Swirl Cake


Alright, I will admit that I’m not the biggest dreamsicle (or do you call it creamsicle?) fan. I’m not a fan of orange flavored anything, really. But this cake was too pretty to pass up! And a cake that is only fitting to make in the summertime.

Dreamsicle Swirl Cake
Recipe source: Showstopping Cakes by Paula Deen
Print Recipe

Orange Cake Batter:
3/4 cup butter, softened
1-1/2 cups sugar
1 Tablespoon orange zest
4 large eggs
3/4 cup orange juice
2-1/2 cups all-purpose flour
2 teaspoons baking powder
1/2 teaspoon salt
3 drops orange food coloring

White Cake Batter:
1 cup butter, softened
2 cups sugar
2-1/2 cups all-purpose flour
2 teaspoons baking powder
1/2 teaspoon salt
3/4 cup milk
6 egg whites, beaten until still

Marshmallow Frosting:
1 jar (7 oz) marshmallow creme
1 cup butter, softened
2-1/2 cups powdered sugar
1/8 teaspoon salt

1. Preheat oven to 350F. Spray 3 9-inch cake pans with nonstick baking spray.
2. To prepare Orange Cake Batter: in a large bowl, beat butter, sugar, and orange zest at medium speed with a mixer until fluffy. Add eggs, one at a time, beating well after each addition. Beat in orange juice. In a medium bowl, combine flour, baking powder, and salt. Gradually add to butter mixture, beating until just combined. Add food coloring. Set batter aside.
3. To prepare White Cake Batter: in a large bowl, beat butter and sugar at medium speed with a mixer until fluffy. In a medium bowl, combine flour, baking powder, and salt. Gradually add to butter mixture alternately with milk, beginning and ending with flour mixture, beating just until combined after each addition. Fold half of beaten egg whites into batter. Gently fold in remaining egg whites.
4. Spoon white batter and orange batter alternately into prepared cake pans. Swirl batter with a knife. Bake for 24-28 minutes or until a tester comes out clean. Cool in pans on wire racks for 10 minutes. Remove from pans, and cool completely on wire racks.
5. Make frosting: In microwave-safe bowl, microwave marshmallow creme on high for 15-20 seconds to soften. Add butter and beat with an electric mixer on medium speed until smooth. Beat in powdered sugar and salt until smooth.
6. Assemble and frost cake.

Dunkaroo Cupcakes


Raise your hand if you remember Dunkaroos from your youth! If you were in grade school in the 90s, you probably ate these as your “dessert” at lunch. And they were amazing. If you’re unfamiliar, you’d get a little compartment of graham cracker kangaroos and another little compartment of frosting. The frosting tasted magical and it included sprinkles, so kids everywhere rejoiced. Does anyone know if Dunkaroos are still sold in stores? I haven’t seen them in years and years.

I’ve seen countless Dunkaroo cupcake recipes on Pinterest, as well as some recipes for just the sprinkled frosting. These things were a cult classic of the 90s, I tell you!

Dunkaroo Cupcakes
Recipe source: Kailley’s Kitchen
Print Recipe

For the cupcakes:
2 cups all-purpose flour
1 cup sugar
1 cup (two sticks) unsalted butter, softened
1 whole vanilla bean
4 large eggs
1 Tablespoon baking powder
2 Tablespoons vegetable oil
3 teaspoons vanilla extract
2 Tablespoons whole milk
1/2 teaspoon salt

For the frosting:
3/4 cup (1.5 sticks) salted butter, softened
3 ounces (about 1/3 block) cream cheese
4 cups powdered sugar
2 teaspoons vanilla extract (or other desired flavor, such as coconut or almond)
2-3 Tablespoons heavy cream (or more for desired consistency)
4 Tablespoons rainbow sprinkles

For the graham cracker crust:
1 cup graham crackers crumbs (use food processor to pulverize)
3 Tablespoons unsalted butter, melted
3 Tablespoons light brown sugar

Plus Teddy Grahams for decoration.

1. Preheat oven to 350 degrees F and line a muffin pan with liners.
2. In a small bowl, combine graham cracker crumbs, melted butter, and light brown sugar. Place about a Tablespoon of the mixture in each muffin liner, patting down with the base of a cup.
3. Bake graham cracker crust for 3 minutes, remove promptly from oven and set aside.
4. Using an electric mixer fitted with a paddle attachment, beat butter and sugar until light and fluffy. Add eggs one at a time, mixing in between each. Add flour, baking powder, salt, and extract and mix until just combined.
5. Slice vanilla bean length-wise, scrape seeds into batter and mix until there aren’t visible clumps of vanilla bean.
6. Add milk and vegetable oil, mix until just combined.
7. Spoon batter into cupcake liners and fill each 3/4 full. Bake for 16-18 minutes until slightly golden, then allow to cool on a wire rack.

For the frosting:
1. In an electric mixer fitted, cream butter and cream cheese until smooth. Add 2 cups of powdered sugar and mix. Add remaining powdered sugar and vanilla extract and mix. Add heavy cream and sprinkles and mix.
2. Fill a piping bag with frosting and pipe onto cupcakes, top with Teddy Grahams*.

*Since when do Teddy Grahams have no face?! Kind of creepy without their smiley little bear faces.

Makes about 16-18 cupcakes.

Blueberry Muffins


You know what’s annoying? Making blueberry muffins from a box mix and having to mix in that little can of teeny, tiny, little, bitty blueberries. I mean, really? Blueberries the size of a pea? Uncool! Make homemade blueberry muffins during the summer – when fresh fruit is at its best.

You know what else is annoying? Making blueberry muffins from scratch and having all of the fresh blueberries sink to the bottom. Again, uncool. The trick to fixing that is to toss the blueberries in a little bit of flour before you add them to the batter. It’s easy. Put your fresh blueberries in a small bowl, add a heaping spoonful of flour, and mix to coat the blueberries. Then add them to your batter. The berries won’t sink!

Blueberry Muffins
Print Recipe

1-1/2 cups all-purpose flour
1 Tablespoon baking powder
1/2 teaspoon salt
1/4 cup sugar
1/2 stick unsalted butter, melted and cooled
1 large egg, beaten
3/4 cup plus 2 Tablespoons milk
1 cup blueberries

1. Preheat oven to 400F. Line a muffin pan with 10 paper muffin cups or spray with nonstick cooking spray.
2. Sift the flour, baking powder, and salt into a large bowl. In a separate bowl, whisk together the sugar, melted butter, egg, and milk. Pour the wet ingredients over the dry ingredients and whisk until just blended (mixture will be slightly lumpy).
3. Add the blueberries and stir them in just enough to combine.
4. Fill the prepared muffin cups with batter (about 3/4 full). Bake the muffins until golden, about 18-24 minutes. Remove the muffins from a pan and cool on a wire rack.

Makes about 10 muffins, which are best served warm.

Disney Princess Cupcakes


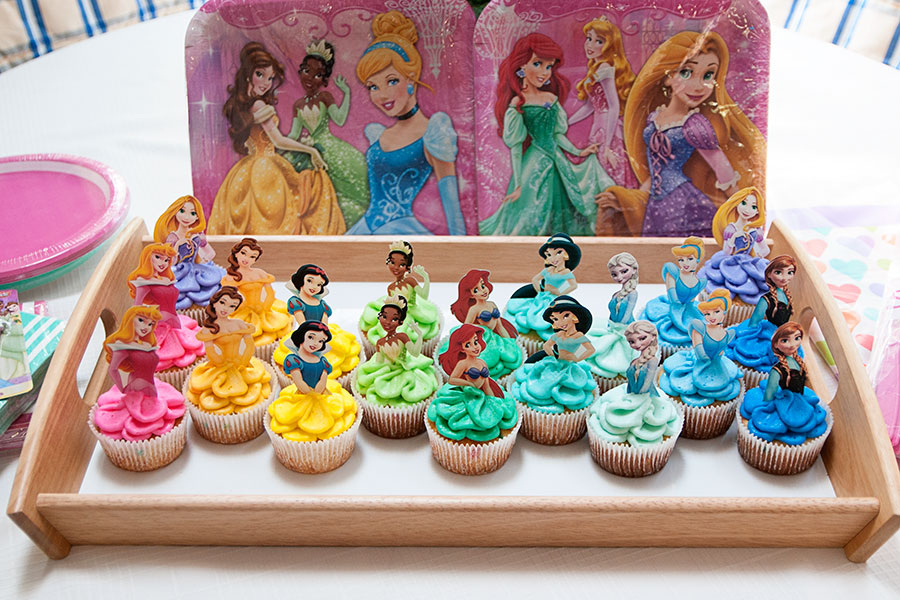
I have made these Disney princess cupcakes twice over the past few months. Once for the girls I babysit and once for my friend’s daughter, who just turned four. Just about every little girl loves princesses – or at least goes through an intense, princess-obsessed phase. I know there’s another side to this story though – the people who are frustrated by the fact that many little girls look up to princesses.

Disney fairytales are unrealistic and imperfect, but I’m alright with that. To a five year old kid, all things Disney are magical in which good always wins over evil — and that is pretty special.

I think Kelly Oxford (who wrote the great “Everything is Perfect When You’re a Liar”) sums up my feelings toward Disney more eloquently that I ever could:

“I suddenly feel a weird sense of community with the other parents in our fake Jeep, helmed by my unskilled and vomit-prone son. All of us laughing and whoa-ing together. All of us spending more money than we should, gambling on a chance to create memories in this place built on make-believe. The best parts of childhood, adulthood, and parenthood are those pure moments of bliss, when you completely forget about your future and past and live in your moment. That, I realize, is why I loved Disneyland as a preteen: it was an escape from that time, from the fears of never getting my period, of being pressured into trying cigarettes, and of liking Days of Our Lives. That’s why there are moms who are itching to dress up like Snow White for an entire day, in public, with zero shame. It’s the best kind of lie. To stop thinking about the shit in our lives for a day and pretend that a princess is real, that the Beast is in the castle, and that they never take off their costumes or meet for some crappy cafeteria lunch and a cigarette behind the facade walls of Main Street.” — Kelly Oxford

These cupcakes were heavily inspired by Erica’s beautiful blog. I encourage you to read her post as well, as she had a heartwarming reason for making the cupcakes.

Disney Princess Cupcakes
Print Recipe
Recipe source: Erica’s Sweet Tooth

24 cupcakes (any kind you would like; I used box mix funfetti)
A batch of buttercream icing (I used the white buttercream icing recipe here)
A large petal tip, Wilton #127
Disposable pastry bags
Food coloring: pink, yellow, buttercup yellow, leaf green, kelly green, and blue
Lollipop sticks, cut in half
Tape
Disney princess pictures
Edible glitter (optional)

A note about the Disney princess pictures: I searched for each individual princess using Google, save the corresponding images, and resized them all so that they would be proportionate. I then printed 4 of each on cardstock. I cut them out and attached them to the lollipop sticks using tape. I do not want to post the princess images on my blog (because it might be a murky area, copyright-wise). But don’t fear – just use Google (ex: search for “cinderella”) and you’ll find the exact same cartoon images that I used. You’ll just need to do a little trial-and-error with resizing them so that they are proportionate. If you have questions about this step, please don’t hesitate to contact me.

1. Bake your cupcakes and allow them to cool entirely. While they are cooling, make a batch of buttercream icing. You may want to make an extra 1/2 batch, especially if you are doing these for the first time and haven’t gotten a hang of using the petal tip.
2. Divide the icing into six small bowls. Use the food coloring to dye each batch a different princess skirt color.
3. Fit a pastry bag with the large petal tip and fill the bag with one of the batches of colored icing. Pipe two layers of petals onto the top of each cupcake. I would highly suggest practicing this on a napkin first. It took me a few tries to get the petal look just right. You will want the wider end of the tip pointing out.
4. Once all of the cupcakes are frosted, stick the Disney princess toppers into the cupcakes.
5. If you have edible glitter, you can add some of that to each cupcake to give them a little sparkle.

Enjoy!


5

Iced Oatmeal Cookies


I could spend this post writing about childhood nostalgia and oatmeal cookies. But I didn’t like oatmeal cookies when I was a kid. I could spend this post raving about the flavor combinations and texture of the cookies. But that’s boring. I could tell you a silly story from my life and somehow relate it back to these cookies. But, nahh. I’ll just say that I loved these cookies. They are plain, they are simple, and they are a classic. And they involve icing. Always a bonus!

Iced Oatmeal Cookies
Recipe source: The Novice Chef
Print Recipe

Cookies:
2 cups old fashioned oats
2 cups all purpose flour
1 tablespoon baking powder
1 teaspoon baking soda
2 teaspoons cinnamon
1 teaspoon freshly ground nutmeg
1 teaspoon salt
1 cup (2 sticks) unsalted butter, melted
1 cup granulated sugar
1/2 cup packed light brown sugar
2 large eggs

Icing:
2 cups powdered sugar
5 tablespoons milk

1. Preheat oven to 350°F and butter two cookie sheets. Set aside. [I used parchment paper instead of butter]
2. In a food processor, pulse oats until partly ground. You don’t want a fine powder, you want a coarse meal. Mix in flour, baking powder, baking soda, cinnamon, nutmeg and salt. Set aside.
3. In a large bowl, beat together the melted butter, sugar and brown sugar. Add eggs, one at a time. Mix in the dry oat mixture, stirring until thoroughly combined.
4. Drop dough by (heaping) rounded tablespoons onto prepared cookie sheets. Bake for 14-16 minutes, rotating halfway through, until browned. Let cookies rest on the baking sheets for 5 minutes before moving to a wire rack to cool completely.
5. Once cookies are completely cooled, whisk together the powdered sugar and milk until smooth. Generously frost each cookie and allow the glaze to harden completely before storing. Store in an airtight container for up to a week.

Makes 18-20 cookies.